Spring Cloud Config 老版采用 git 或 svn 存储配置文件,默认情况下使用 git。从 Edgware 版本开始新增的一种配置方式:采用数据库存储配置信息。
1 结构与原理
Spring Cloud Config 分服务端和客户端,服务端负责将 git(svn)中存储的配置文件发布成 REST 接口,客户端可以从服务端 REST 接口获取配置。
- Server
- 拉取配置时更新git仓库副本,保证是最新结果
- 支持数据结构丰富,yml, json, properties 等
- 配合 eureke 可实现服务发现,配合 cloud bus 可实现配置推送更新
- 配置存储基于 git 仓库,可进行版本管理
- 简单可靠,有丰富的配套方案
- Client
- Spring Boot 项目不需要改动任何代码,加入一个启动配置文件指明使用 ConfigServer 上哪个配置文件即可

2 Git 示例
2.1 准备 git
准备 git 仓库,放置配置文件
test-config-dev.properties:test=dev
test-config-pro.properties:test=pro
2.2 构建配置中心
配置中心负责从配置仓库读取配置,并提供接口访问
1)pom 依赖
<dependencies>
	<dependency>
		<groupId>org.springframework.cloud</groupId>
		<artifactId>spring-cloud-config-server</artifactId>
	</dependency>
</dependencies>
2)配置文件
如果 Git 仓库需要权限,配置 username、password,否则不用
spring.application.name=config-server
server.port=8001

spring.cloud.config.server.git.uri=https://github.com/……    # 配置git仓库的地址
spring.cloud.config.server.git.searchPaths=respo  # 仓库下相对地址,可配多个,逗号分割。
spring.cloud.config.label=master # 配置仓库的分支
spring.cloud.config.server.git.username=# git仓库的账号
spring.cloud.config.server.git.password=# git仓库的密码
3)启动类
添加 @EnableConfigServer 注解,开启 Spring Cloud Config 的服务端功能。
@EnableConfigServer
@SpringBootApplication
public class Application {
访问配置信息的 URL 与配置文件的映射关系如下:
/{application}/{profile}[/{label}]
/{application}-{profile}.yml
/{label}/{application}-{profile}.yml
/{application}-{profile}.properties
/{label}/{application}-{profile}.properties
上面的 url 会映射 {application}-{profile}.properties 对应的配置文件,其中 {label} 对应 Git 上不同的分支,默认为 master。
2.3 构建客户端
1)pom 依赖
	<dependency>
		<groupId>org.springframework.cloud</groupId>
		<artifactId>spring-cloud-starter-config</artifactId>
	</dependency>
2)配置文件
application.properties:
//对应{application}部分
spring.application.name=config-client
server.port=8002
bootstrap.properties:
config 相关属性必须配置在 bootstrap.properties 中,先于 application.properties,才能被正确加载。
spring.cloud.config.name=neo-config
spring.cloud.config.profile=dev
spring.cloud.config.uri=http://localhost:8001/
spring.cloud.config.label=master
- spring.cloud.config.name:覆盖 spring.application.name,对应{application}部分
- spring.cloud.config.profile:对应{profile}部分
- spring.cloud.config.label:对应{label}部分
- spring.cloud.config.uri:配置中心config-server的地址
3)启动类
添加 @EnableConfigServer,激活对配置中心的支持
@SpringBootApplication
public class ConfigClientApplication {
4)取值
像使用本地配置文件一样,使用 @Value 注解来获取 server 端参数的值
2.4 高可用
- 传统作法 将Config Server扩展为高可用的集群。只需将所有的Config Server都指向同一个Git仓库,并配置Config Server外的均衡负载:
- 服务化 把config-server注册为服务,客户端以服务的方式进行访问。 以eureka为例,将服务端注册到eureka,并修改客户端bootstrap.properties
spring.cloud.config.uri
改为
eureka.client.serviceUrl.defaultZone=http://localhost:8000/eureka/
spring.cloud.config.discovery.enabled=true
spring.cloud.config.discovery.serviceId=config-server
2.5 配置刷新
1)基础方法
同 Git 仓库的 Web Hook 功能进行关联,当有 Git 提交变化时,就给对应的配置主机发送 /refresh 请求来实现配置信息的实时更新。
-
添加依赖
pom 添加spring-boot-starter-actuator模块,监控状态,包括 /refresh 功能 -
开启更新机制
给加载变量的类上面加载 @RefreshScope ,在客户端执行 /refresh 的时候就会更新此类下面的变量值。
2)消息总线
-
原理
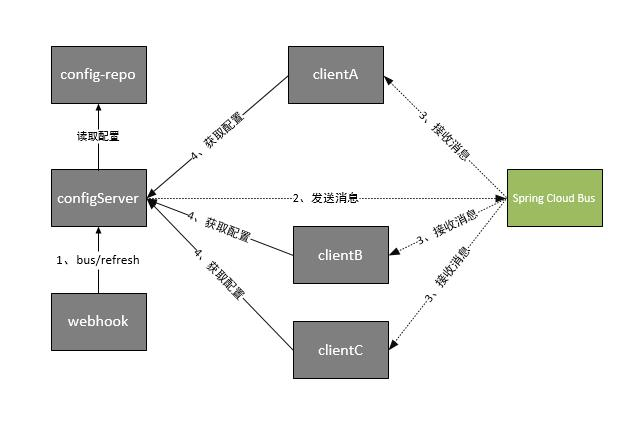
服务端和客户端都配置消息,配置后 WebHook 触发服务端,服务端通过 Spring Cloud Bus 广播 /refresh,客户端收到消息都去更新配置。 -
配置
以 RabbitMq 为例,服务端和客户端都添加spring-cloud-starter-bus-amqp依赖,配置文件增加 RabbitMq 相关配置,订阅同一频道,关闭安全验证。management.security.enabled=false。 -
步骤
3.1 提交代码 WebHook 触发 post 请求给 bus/refresh
3.2 server 端接收到请求并发送给 Spring Cloud Bus
3.3 Spring Cloud bus 接到消息并通知给其它客户端
3.4 其它客户端接收到通知,请求 Server 端获取最新配置
3.5 全部客户端均获取到最新的配置

2.6 安全控制
1)url 连接加密
如果觉得直接访问 config-server 的 url 不安全,可以使用 Spring Security 进行安全控制 。
(1) config-server端配置
pom 依赖
<dependency>
<groupId>org.springframework.boot</groupId>
<artifactId>spring-boot-starter-security</artifactId>
</dependency>
配置文件
security:
  user:
    password: 123456
    name: user
(2)config-client 端配置
配置文件中添加验证信息
spring.cloud.config.username=user
spring.cloud.config.password=123456
2)数据传输加密
Spring Cloud Config 提供了对敏感信息进行加密解密的功能。
在属性值前使用{cipher}前缀来标注该内容是一个加密值,当微服务客户端来加载配置时,配置中心会自动的为带有{cipher}前缀的值进行解密。
- 使用前提
不限长度的 JCE。JRE 中自带有长度限制的 JCE,需从 Oracle 的官方网站中下载 local_policy.jar 和 US_export_policy.jar,复制到 $JAVA_HOME/jre/lib/security,覆盖原来的默认内容。 - 配置密钥
对称加密:在配置文件中直接指定密钥信息encrypt.key非对称加密:通过keytool工具来生成密钥对,配置文件encrypt.key-store.location指定.keystore文件位置
3 数据库示例
3.1 pom 依赖
<parent>
    <groupId>org.springframework.boot</groupId>
    <artifactId>spring-boot-starter-parent</artifactId>
    <version>1.5.11.RELEASE</version>
    <relativePath/>
</parent>

<dependencies>
    <dependency>
        <groupId>org.springframework.cloud</groupId>
        <artifactId>spring-cloud-config-server</artifactId>
    </dependency>
    <dependency>
        <groupId>org.springframework.boot</groupId>
        <artifactId>spring-boot-starter-jdbc</artifactId>
    </dependency>
    <dependency>
        <groupId>org.flywaydb</groupId>
        <artifactId>flyway-core</artifactId>
        <version>5.0.3</version>
    </dependency>
    <dependency>
        <groupId>mysql</groupId>
        <artifactId>mysql-connector-java</artifactId>
        <version>5.1.21</version>
    </dependency>
</dependencies>

<dependencyManagement>
    <dependencies>
        <dependency>
            <groupId>org.springframework.cloud</groupId>
            <artifactId>spring-cloud-dependencies</artifactId>
            <version>Edgware.SR3</version>
            <type>pom</type>
            <scope>import</scope>
        </dependency>
    </dependencies>
</dependencyManagement>
3.2 准备 schema 创建文件。
在 resources 下创建 schema 目录,并加入 V1_Base_version.sql 文件,该脚本会在程序运行时由 flyway自动执行
CREATE TABLE `properties` (
  `id` int(11) NOT NULL,
  `key` varchar(50) NOT NULL,
  `value` varchar(500) NOT NULL,
  `application` varchar(50) NOT NULL,
  `profile` varchar(50) NOT NULL,
  `label` varchar(50) NOT NULL,
  PRIMARY KEY (`id`)
) ENGINE=InnoDB DEFAULT CHARSET=utf8;
3.3 创建应用主类
@EnableConfigServer
@SpringBootApplication
public class ConfigServerBootstrap {
    public static void main(String[] args) {
        ApplicationContext context = SpringApplication.run(ConfigServerBootstrap.class);
        // 测试用数据,仅用于本文测试使用
        JdbcTemplate jdbcTemplate = context.getBean(JdbcTemplate.class);
        jdbcTemplate.execute("delete from properties");
        jdbcTemplate.execute("INSERT INTO properties VALUES(1, 'com.message', 'test-stage-master', 'config-client', 'stage', 'master')");
        jdbcTemplate.execute("INSERT INTO properties VALUES(2, 'com.message', 'test-online-master', 'config-client', 'online', 'master')");
        jdbcTemplate.execute("INSERT INTO properties VALUES(3, 'com.message', 'test-online-develop', 'config-client', 'online', 'develop')");
        jdbcTemplate.execute("INSERT INTO properties VALUES(4, 'com.message', 'hello-online-master', 'hello-service', 'online', 'master')");
        jdbcTemplate.execute("INSERT INTO properties VALUES(5, 'com.message', 'hello-online-develop', 'hello-service', 'online', 'develop')");
    }
}
3.4 配置 application.properties
spring.application.name=config-server-db
server.port=10020
//将配置中心的存储实现切换到jdbc的方式
spring.profiles.active=jdbc
//由于采用mysql数据源,key、value是保留关键词,原生的实现语句会报错,所以重写一下查询语句
spring.cloud.config.server.jdbc.sql=SELECT `KEY`, `VALUE` from PROPERTIES where APPLICATION=? and PROFILE=? and LABEL=?

spring.datasource.url=jdbc:mysql://localhost:3306/config-server-db
spring.datasource.username=root
spring.datasource.password=
spring.datasource.driver-class-name=com.mysql.jdbc.Driver

//flyway加载schema创建sql的位置
flyway.locations=/schema